
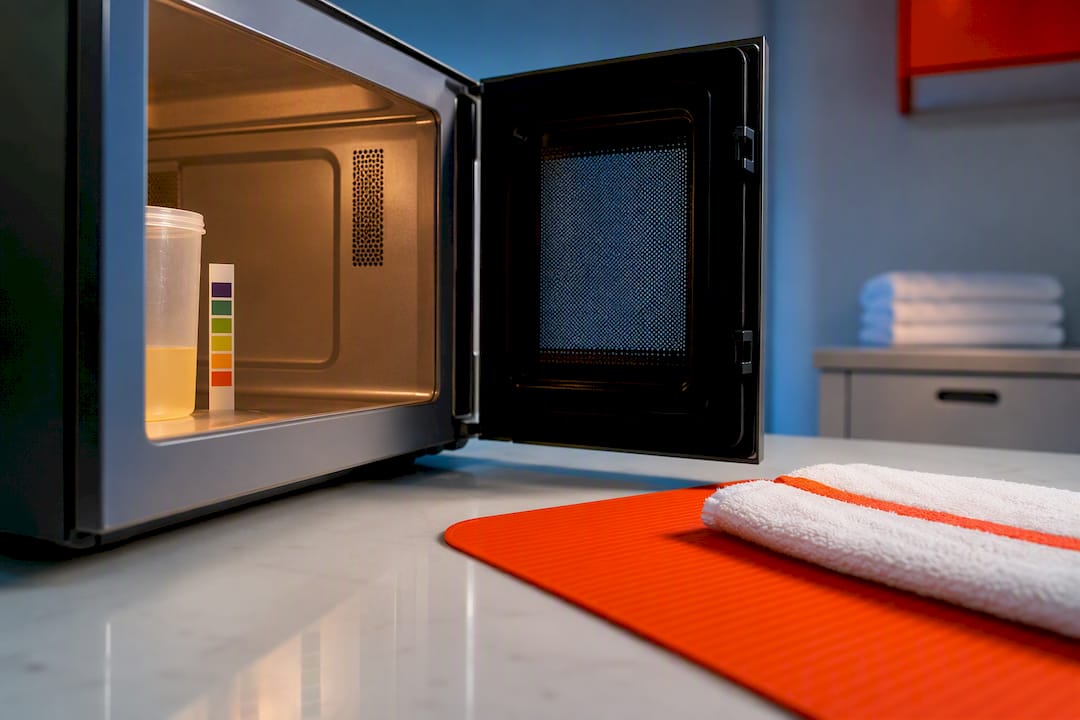
Reach 90–100°F Fast by Microwaving Synthetic Urine in 10 Second Bursts
Yes, most premixed synthetic urine kits can go in the microwave for a few seconds, and that’s the fastest way to get a cold bottle into range when you’re short on time. The rule is simple: pop the cap off, microwave in short bursts starting around 10 seconds, then check the strip. You’re aiming for 90°F to 100°F (32°C to 38°C), and the temperature strip taped to the bottle is the only judge that matters.
TL;DR:
- Microwave in short bursts of about 10 seconds to avoid overheating and check the temperature strip for accurate readings between attempts.
- Remove the cap before heating to prevent pressure buildup and ensure even heating, while avoiding repeated high-power cycles that can damage the sample.
- Use factory heat pads for reliable temperature maintenance over 30 to 60 minutes, or supplement with body heat by storing the bottle close to your torso if delayed.
- Overheated samples often show no temperature strip reading and will need cooling passively or with brief water dips before re-heating in small increments.
- Always follow specific kit instructions and check expiration dates; avoid microwaving sealed bottles or metal objects to prevent damage and inaccurate results.
Table of Contents
- How to Microwave Synthetic Urine: A Step-by-Step Checklist
- Maintaining Temperature: Heat Pads, Hand Warmers, and Body Heat
- What to Do If the Strip Won’t Read or the Bottle Feels Too Hot
- Storing Kits and Prepping Ahead of Time
- Microwave Safety and the Legal Reality Worth Knowing
- Why Passmydrugtest Focuses on the Fine Print
- What’s Actually in Synthetic Urine, and Does Heat Change It?
- How Labs Try to Catch Synthetic Urine, and Where That Leaves You
- The Legal Gray Area Nobody Talks About Plainly
- A Few Things Worth Testing Before Your Actual Appointment
- Kits Built for This: What Passmydrugtest Recommends
- Sources
How to Microwave Synthetic Urine: A Step-by-Step Checklist
Before anything touches the microwave, look at the kit itself. Confirm the batch code hasn’t expired, and make sure the temperature strip is actually adhered to the bottle and not peeling off in the box. A strip that isn’t making full contact with the liquid will give you a false reading no matter how well you heat the sample, and you won’t find that out until it’s too late.
Once the kit checks out, here’s the sequence that works with almost any premixed synthetic urine on the market:
- Remove the cap. Microwaving a sealed bottle traps pressure, and that’s how bottles crack or leak inside the microwave.
- Center the bottle on the turntable. Off-center placement creates hot spots because microwave power distributes unevenly across a container, and one side can overheat while the other stays lukewarm.
- Microwave on high for about 10 seconds. That’s the widely used starting point, and it’s short enough that you’re unlikely to overshoot on a first try.
- Put the cap back on loosely and shake. This distributes heat evenly through the liquid instead of leaving a hot layer at the surface.
- Read the strip after letting it sit a few seconds. Liquid needs a moment to settle before the reading is accurate.
- If it’s still cold, add heat in 3 to 5 second bursts. Small increments beat one long zap because they give you control instead of guesswork.
Here’s what the strip is actually telling you:
- A clear color change lining up with the printed scale means you’re in range and the sample is ready to go.
- A dull or unchanged strip usually means the liquid is still too cool. Give it another short burst.
- No reading at all, even after shaking, typically means the sample got too hot rather than too cold. Overheated liquid can push the strip past its readable range entirely.
Pro Tip: Shake the bottle before you ever put it in the microwave, too. Some of these formulas settle during storage, and heating an unshaken bottle can create pockets that read differently than the bulk of the liquid.
Once the strip confirms you’re at temperature, seal the cap tightly, attach the included heat pad on the side opposite the strip, and wrap the bottle in whatever you’re using to carry it, whether that’s a pouch, a sock, or a pocket close to your body. The goal now shifts from heating to holding. A 10 second burst followed by incremental checks is the safest default because every microwave runs at slightly different wattage, and what takes 10 seconds in one unit might overheat the bottle in another.
Maintaining Temperature: Heat Pads, Hand Warmers, and Body Heat
Getting the sample warm is only half the job. Keeping it warm for the next 30, 60, or 90 minutes is what actually determines whether it passes inspection at the collection site.
Factory heat pads are the standard tool for this, and most kits include one for a reason. Attach the pad to the side of the bottle opposite the temperature strip so it doesn’t interfere with your reading, and secure it with the rubber band or tape that came in the box. Heat pads typically need 30 to 60 minutes to reach full warmth and can hold that temperature for several hours once activated, which makes them far more forgiving than a microwave if your appointment gets delayed.
Disposable hand warmers work as a backup when a factory pad isn’t available or hasn’t activated properly, but they run hotter and less evenly than a purpose-made pad. Never let a hand warmer touch the bottle or the strip directly. Wrap it in a thin cloth or paper towel first, then position it against the bottle the same way you would a heat pad. Direct contact risks localized overheating that can cook one section of the strip while the rest of the liquid stays cool.
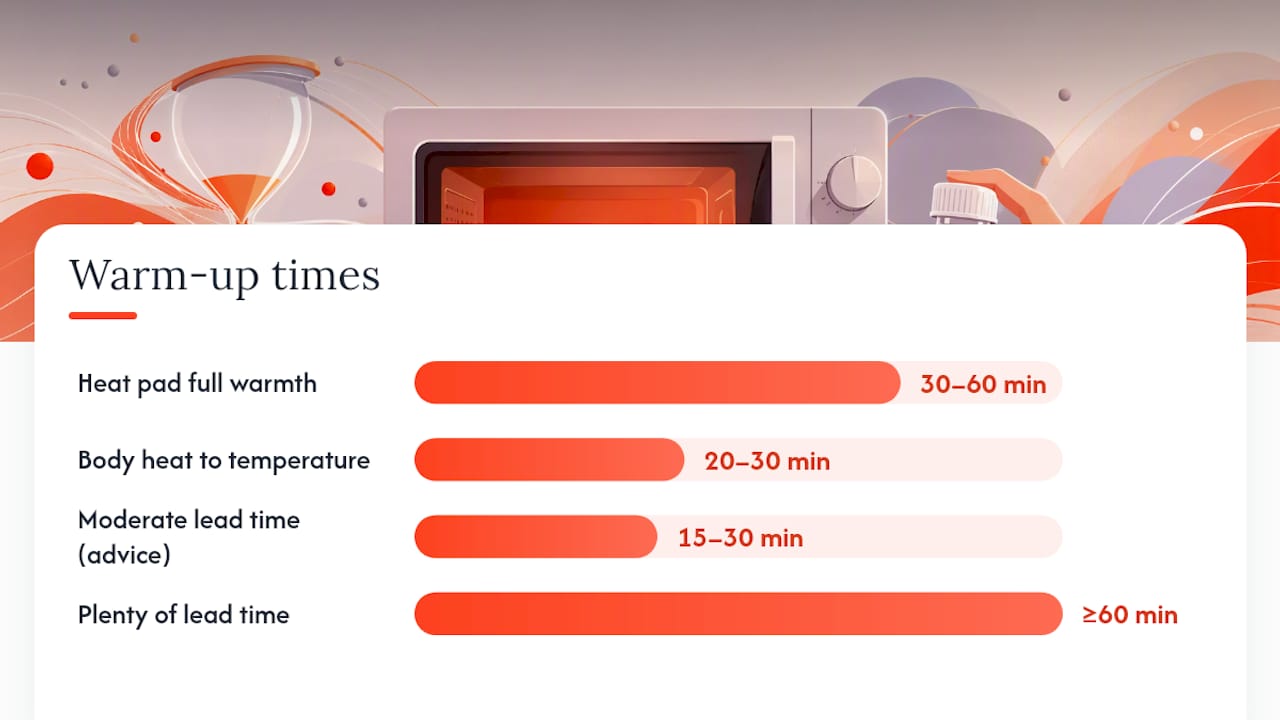
Body heat is the oldest trick in the book, and it still works because your skin sits right around 98.6°F, which lands squarely in the target zone. A bottle tucked into a waistband, a bra, or an inner pocket close to the torso will slowly climb toward body temperature over 20 to 30 minutes. The tradeoff is speed: body heat alone is slow and inconsistent compared to a heat pad, so it works best as a maintenance method after you’ve already microwaved the sample to temperature, not as your primary heat source.
A small insulated pouch, the kind meant for lunch bags or medication, adds another layer of protection against temperature swings, especially in cold weather when a coat pocket alone won’t cut it.
- Plenty of lead time (an hour or more): activate a heat pad early and let body heat do the rest.
- Moderate lead time (15 to 30 minutes): microwave first, then attach the heat pad immediately for a faster ramp.
- No lead time: microwave in short bursts and go straight to insulated body-wear, skipping the pad activation delay entirely.
Pro Tip: Activate your heat pad before you leave the house, not in the parking lot. Most pads need a few minutes of exposure to air to kick on, and fumbling with one in a bathroom stall wastes time you don’t have.
What to Do If the Strip Won’t Read or the Bottle Feels Too Hot
A blank or unreadable strip after shaking almost always means one thing: the sample overheated rather than failed to heat at all. If the bottle feels noticeably hot to the touch and the strip shows nothing, that’s your signal to stop microwaving and start cooling.
Here’s the sequence to work through:
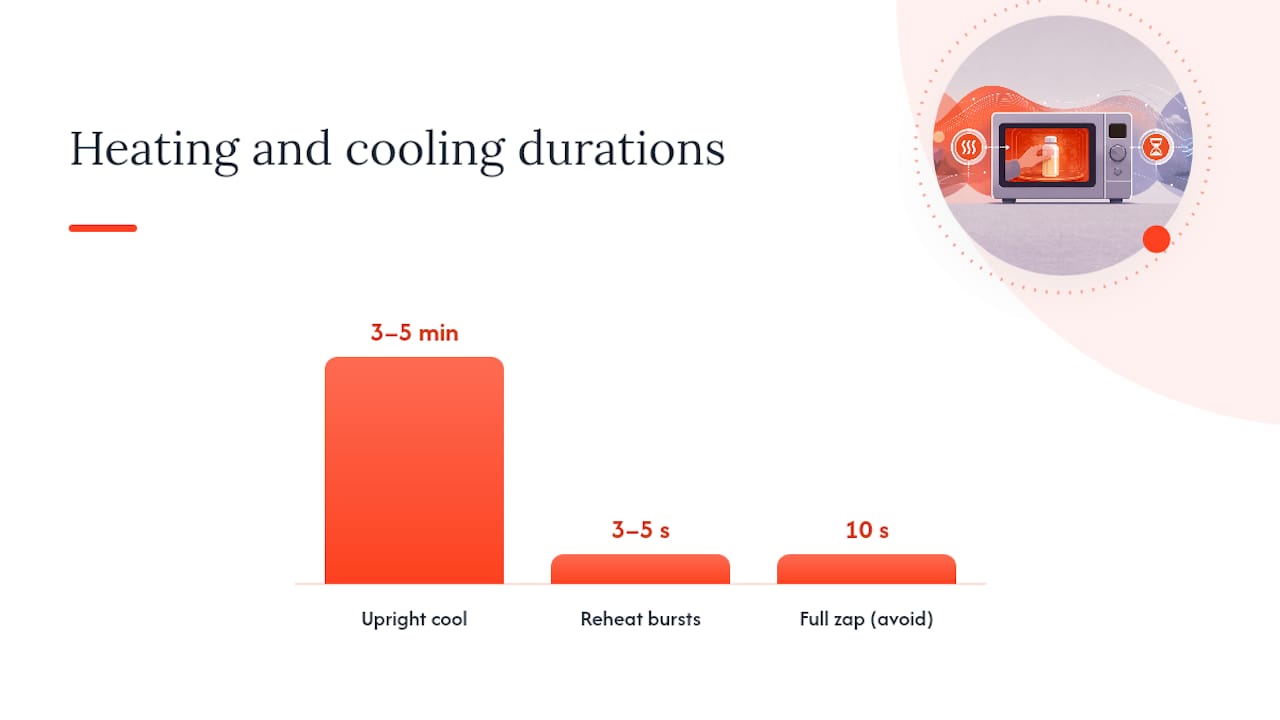
- Set the bottle upright on the counter for 3 to 5 minutes. Let it cool passively before doing anything else.
- Dip the bottle briefly in cool, not icy, water if it’s still too hot. A quick dip can pull the temperature down by a degree or two, enough to bring it back into readable range.
- Recheck the strip after shaking again. If it’s now giving a readable, in-range result, you’re good to go.
- If it’s still too cool after cooling down, reheat in small bursts of 3 to 5 seconds. Don’t jump back to a full 10 second zap on a bottle that just came out of the microwave.
A few things to avoid entirely:
- Never microwave a sealed bottle. The cap has to come off first, every time, no exceptions.
- Don’t apply direct flame, a stovetop, or boiling water to the container. These methods are far less controllable than a microwave and more likely to damage the bottle or degrade the liquid.
- Skip repeated high-power cycles. Zapping the same bottle on high two or three times in a row is how you end up with a sample that’s alternately too hot and too cold, and gentler reheating in smaller increments works better than brute-forcing it with the microwave.
- Don’t put metal objects, including foil-wrapped heat pads, in the microwave. Check what you’re heating before you hit start.
Repeated overheating isn’t just a temperature problem. A sample that’s been zapped too many times can start to look or smell different from what it should, and that’s the kind of detail a trained collector notices during specimen intake.
Storing Kits and Prepping Ahead of Time
Unopened synthetic urine kits are more forgiving on the shelf than most people expect. Manufacturer guidance commonly points to a shelf life of around two years when the kit is stored unopened, at room temperature, and out of direct sunlight. Heat and UV exposure are what degrade these formulas over time, so a glove box in a hot car is one of the worst places to keep one.
A few habits worth building into your routine:
- Check the batch code and expiration date before every use, not just when you first buy the kit.
- Store bottles at room temperature, away from windows, radiators, or anywhere the ambient temperature swings widely.
- Once a sample is warmed and prepped, use it soon rather than carrying it around for hours before your appointment. A heat pad can hold temperature for a while, but a prepped, warmed bottle is best used within a reasonable timeframe to maintain accuracy.
- Treat the printed insert that ships with your kit as the final word. Formulas and packaging change between manufacturers and even between production runs, so instructions can shift slightly year to year.
If you’re buying ahead of a scheduled test, there’s no downside to picking up a kit weeks in advance. Just keep it in a stable environment until the day you need it, and do a quick visual check of the seal and packaging before you start the warming process.
Microwave Safety and the Legal Reality Worth Knowing
A few safety habits matter more than people expect once a microwave is involved. Always remove the cap before heating. A sealed bottle builds internal pressure as the liquid warms, and that pressure has to go somewhere. Heat only in short bursts rather than one long cycle, and never microwave a container you haven’t opened first.
Independent reports describe occasional incidents where improper microwaving caused splatter or bottle damage, almost always tied to skipping the cap-removal step or running the microwave too long in one go. If you’re at all unsure about your microwave’s wattage or how it handles small containers, a heat pad is the lower-risk option and skips the guesswork entirely.
- Remove the cap before every microwave cycle.
- Stick to short bursts, checking the strip between each one.
- Never microwave a sealed container, regardless of how confident you feel.
- When in doubt, default to a heat pad instead of the microwave.
On the legal and ethical side, one thing is worth being direct about: rules around synthetic urine and drug testing vary by state, by employer policy, and by the type of test being administered. Some situations carry real consequences depending on jurisdiction and context. This article isn’t legal advice, and if you have specific concerns about your situation, a qualified attorney or compliance professional is a better resource than a how-to guide.
Why Passmydrugtest Focuses on the Fine Print
Passmydrugtest built its guides around one recurring problem: manufacturer instructions get skimmed, not read, and that’s usually where things go wrong. The site pairs its product catalog with the kind of step-by-step detail most kit inserts compress into three lines of tiny print.
That combination matters here specifically. A temperature strip is the difference between a sample that gets accepted and one that gets flagged, and understanding how to read one correctly is worth more than any single product feature.
- Fast US shipping means a kit ordered today has a real shot at arriving before a scheduled test date.
- Phone support during business hours gives you a real person to call if a strip is behaving oddly or a heat pad won’t activate.
- Educational content sits alongside the product catalog, so you’re not choosing a kit blind or guessing at how to prep it.
If a specific product’s instructions ever conflict with general guidance like what’s covered here, the printed kit insert or product page is the one to trust. Formulas and packaging shift between manufacturers, and Passmydrugtest’s product pages are kept current with what actually ships in each kit.
What’s Actually in Synthetic Urine, and Does Heat Change It?
Synthetic urine is built to mimic real urine on the markers a lab typically checks: pH, specific gravity, creatinine, and urea, among others. It’s a formulated liquid engineered to read as normal human urine across those standard checkpoints.
Brief microwave exposure at the temperatures discussed here, well under boiling, isn’t hot enough to break down these compounds. The concern with heat isn’t chemical degradation from a single 10 second burst. It’s overheating past the point where the liquid reads as biologically plausible, or repeated heating cycles that leave visible changes in color or clarity. A sample heated correctly once, per the instructions, should test the same as one straight out of the box, just warmer.
How Labs Try to Catch Synthetic Urine, and Where That Leaves You
Collection sites don’t rely on temperature alone anymore. Modern screening protocols often check pH, specific gravity, and the presence of creatinine, all values that real urine falls within predictable ranges for and that lower-quality synthetic formulas sometimes miss. Some facilities also use direct observation for certain test types specifically because temperature strips and formula quality have improved on the product side.
Temperature remains the first and fastest checkpoint, though, which is exactly why it gets so much attention in prep guides like this one. A sample outside the 90°F to 100°F window is often flagged before any lab chemistry is even run, regardless of how well-formulated the liquid is. That’s the practical reality: temperature is the gate you have to clear first, and it’s also the one most within your control on test day.
The Legal Gray Area Nobody Talks About Plainly
Laws on synthetic urine possession and use vary by state, and some states have specific statutes addressing it while others don’t address it at all. Employer policies add another layer entirely, separate from state law, and a company’s internal consequences for a failed or tampered test can differ significantly from any legal exposure.
None of this is a single, uniform answer, which is exactly why blanket claims about legality online tend to be unreliable. If the stakes are high, whether that’s a job, a legal proceeding, or a probation requirement, checking your specific state’s statutes or talking to someone qualified is worth more than any generic guide, including this one.
A Few Things Worth Testing Before Your Actual Appointment
Run your heating routine at home first, before the day it actually counts. Microwave wattage varies enough between units that the “10 seconds” you read online might be closer to 7 or 14 seconds for your specific microwave, and you want to know that ahead of time, not while you’re standing in a parking lot.
Two habits I’d build in early: keep a small insulated pouch in your bag or car specifically for this purpose, and activate any heat pad well before you think you need to. Pads take time to kick in, and starting one at the last minute defeats the point of carrying one at all.
If a temperature strip ever behaves inconsistently, reading fine one time and blank the next on what seems like the same kit, that’s worth a call to support rather than a guess. A pattern like that usually points to a specific batch issue, and it’s better to catch it during a practice run than during the real one.
— MIchael
Kits Built for This: What Passmydrugtest Recommends
If you’d rather not troubleshoot temperature strips and heat pad timing on your own, Passmydrugtest stocks premixed kits that ship with both already built in, so you’re not assembling a solution from separate parts under time pressure. Every kit listed on the site includes prep instructions specific to that formula, not generic advice pulled from somewhere else.
The full catalog of drug testing products covers kits at different price points, all including a temperature strip and heat pad as standard. Orders placed for US delivery ship fast, which matters when a test date lands with only a few days’ notice. If you’re not sure which kit fits your situation, whether that’s a scheduled pre-employment screen or a shorter-notice request, phone support during business hours can walk you through the differences before you buy.
Check the kit-specific instructions on the product page before your test date, and reach out to support directly if anything about your specific kit’s temperature strip or timing doesn’t match what you expected.
Sources
The step-by-step guidance in this article draws from manufacturer-style instructions and independent how-to reporting that consistently point to the same core numbers: short microwave bursts around 10 seconds, a target range of 90°F to 100°F, and heat pads as the standard tool for longer holds. MedShun’s reporting on microwave timing and its follow-up on overheating and recovery cover both the heating process and what to do when it goes wrong. Independent guidance on maintaining urine temperature backs up the same target range from a different angle.
None of these replace the instructions printed inside your specific kit. Formulas differ between manufacturers, and the insert that ships with your product is the authoritative source for that exact kit, every time.
- Microwaving Synthetic Urine: How Long Is Too Long? | MedShun
- Microwaving Synthetic Urine: Will It Survive The Zap? | MedShun
- How to Maintain Urine Temperature for Drug Test